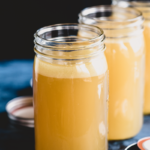
Homemade Bone Broth: Stovetop
- Prep Time: 10 mins
- Cook Time: 12 hours
- Total Time: 12 hours 10 mins
Ingredients
Scale
- Enough fresh or frozen bones to fill the stock pot 2/3 full
- 2 – 3 carrots
- 2 sticks of celery
- 1 medium onion
- 2 – 3 tbsp / 30 – 45 ml apple cider vinegar
- 1 – 2 bay leaves
- 2 – 3 sprigs rosemary
- Handful of fresh thyme
- 1 tbsp / 15 g fine sea salt or fine Himalayan salt, or to taste
- Enough water to just cover the bones
Instructions
- ROAST, optional: If you’re using larger beef, lamb or pork soup bones that haven’t already been cooked, you can add extra depth of flavor by roasting them first. Preheat the oven to 400°F (205°C). Lay the bones out on a lined baking tray (or two, depending on your bones) and roast for 1 hour. Let cool slightly.
- PREP: Place the bones into the stock pot until it is about 2/3 full. Chop the carrots and celery into about 3 pieces each, then peel and quarter the onion. Nestle the vegetable pieces in and around the bones, then pour over the apple cider vinegar and add the herbs. Add salt, to taste, and then add enough water to cover the bones by an inch or so, while still leaving plenty of room to avoid any spills.
- COOK: Bring the water to a good rolling simmer over medium high heat on the stovetop, then turn the heat down to low and cover the pot with a lid. Cook on low for 12 – 24 hours (or longer if you like). If there is any foam or impurities on the top of your broth, skim it off as it rises. Top off with additional water as needed, to make sure that the bones are always covered with water while cooking and the pot doesn’t reduce or boil dry.
- STRAIN: Using oven gloves, carefully transfer the stock pot to a trivet. Place a colander inside a large mixing bowl. Use tongs or a slotted spoon to remove any large pieces of bone and vegetables to the colander – this helps avoid messy splashing in a minute! Pour the rest of the broth and bits carefully through the colander and into the mixing bowl, setting the cooking container onto the trivet again once it’s empty. Once the liquid has drained through the colander completely, place it inside the empty Instant Pot insert to cool.
- REPEAT: Place a fine mesh strainer on top of the gallon pitcher, then line that with a few layers of cheesecloth. Carefully strain the broth for a second time, pouring it from the bowl into the pitcher, through the strainer and cheesecloth to catch any remaining sediment or bone bits.
- STORE: Carefully divide the broth, pouring it into wide mouth Mason jars. Pop the lids on and transfer them to the fridge. Once they have cooled completely, you can transfer them to the freezer if you like, but make sure to leave plenty of head room for the broth to expand if you are going to freeze it in glass jars! If your broth has a good layer of fat on top, it will keep in the fridge for at least a week and often much longer. Frozen broth can be kept for at least 6 months.
- DISCARD: If you would like to save your bones to reuse, let them cool enough to handle first. Discard any herb stems, meat or pieces of fat. Go through the cooled bones, discarding any that are soft enough to crumble under a little pressure. Keep the remaining bones, transferring them to an airtight container and saving them in the freezer until you have enough bones to make a new batch of broth.
Find it online: https://meatified.com/homemade-bone-broth/
